Properly soldering no-lead copper alloys
by Katie Daniel | May 5, 2015 3:04 pm
 [1]
[1]by Andy Kireta Jr.
Last year, new federal guidelines were introduced, reducing the acceptable levels of lead that can be found in various plumbing components used for potable water applications. This change had a major impact on plumbing professionals, as well as the industry as a whole.
Manufacturers, retailers, plumbers, contractors, and technicians who make, sell, and install these newer, no-lead plumbing components and fittings had to ensure the proper soldering techniques were being applied so these products were safe to use in commercial, institutional, and residential applications.
Code changes
The Reduction of Lead in Drinking Water Act (RLDWA) was enacted by the federal government as a way to control the amount of bacterial and chemical contaminates in tap water that leached from pipes, faucets, and other plumbing fittings and components. RLDWA minimized the acceptable levels of lead in the nation’s supply of drinking water from those originally established in the Safe Drinking Water Act (SDWA) of 1974.
The significant reduction in allowable lead content—from eight percent of the total volume of the component, to a new weighted average of 0.25 percent of the total surface area of the component in contact with the water (i.e. wetted surface area)—affects the chemical composition of copper alloys that can be used for potable water applications, as well as the design of components made from these alloys.
While copper tube and fittings have always been lead-free—and been used to convey water for thousands of years—many copper alloys, such as brasses and bronzes, have included small amounts of lead in their composition to provide beneficial machining properties, allowing the manufacturing of complex parts. Across the industry, copper-based alloys are the most commonly used materials for valves, backflow preventers, faucets, and various other components for plumbing systems.
With the new RLDWA in place, the demand for working with no-lead/low-lead components has grown, and so did questions from the plumbing community on how to install them. Issues regarding the joining process between the copper tube and these new, no-lead copper alloys emerged, including:
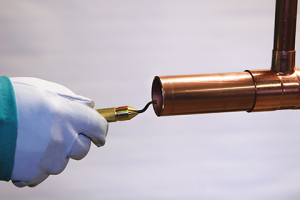
- proper cleaning methods;
- acceptable flux types; and
- torch tip sizes.
As a result, contractors, installers, and plumbers were perplexed by the number of leaks and faulty joints they were seeing in the field despite using traditional soldering techniques.
The trade association representing the majority of U.S. copper tube and fittings industry, the Copper Development Association (CDA), was able to provide the technical guidance and resources to mitigate the soldering issues.
It assisted in developing the standard soldering procedures in the copper and plumbing industry, and has taught these procedures to installers. After more than a year of in-field and laboratory research with various installers, training facilities, and contractors, CDA came to the conclusion the problems were directly related to a misunderstanding, or in many cases, the misapplication of the industry standard soldering procedure. Those working with new no-lead copper alloys—such as bismuth, silicon, sulfur, or selenium—were not heating the joint correctly.
As some of the newer alloys have different thermal conductivity properties than their earlier counterparts, the proper amount of heat and the location where it is applied, plays a key role in the joining process. When using the new no-lead, brass and bronze copper alloys, the following four steps for properly soldering joints should be followed.
 [2]
[2]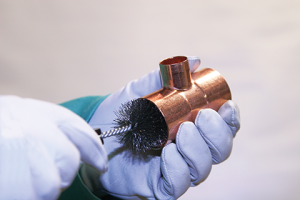 [3]
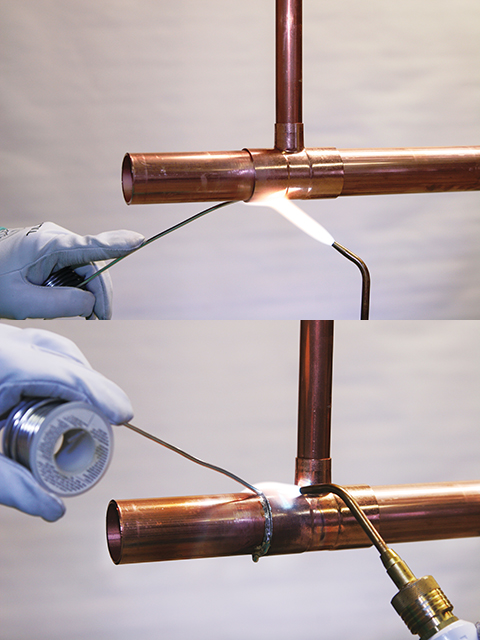
[3] Step one: Preheat the tube
With the new, no-lead fittings/components, it is beneficial to preheat the tube more than would traditionally be done. First, the interior surfaces of the fitting/component should be heated from the tube surface. The preheating of the tube should be undertaken with the appropriately sized torch tip directing the flame perpendicular to the tube—about the same distance from the fitting cup as the length of tube inserted into the solder cup. For example, if the fitting cup is 25-mm (1-in.) deep, the tube should be preheated approximately 25 mm beyond the face of the joint. While there is no definitive time limit on preheating, the tube should be preheated until the flux at the face of the joint begins to become active (i.e. begins showing signs of cleaning the tube/fitting surfaces).
Step two: Preheat the fitting/component
Once the appropriate preheat has been applied to the tube, the flame should be moved back onto the fitting/component surface to the base of the fitting cup. Preheating the fitting is most effective when the torch is directed from the back of the fitting cup to the face of the solder cup. This torch position directs the greatest amount of heat from the back of the fitting cup towards the face, where the solder will be applied. This allows for the primary flame of the torch to concentrate heat into the fitting/component while allowing the secondary flame to keep the tube surface at temperature.
Step three: Apply heat and solder
Since the copper tube has excellent thermal conductivity, it will conduct heat throughout the tube length inside the fitting space. Additionally, the tube is expanding into the fitting cup, maintaining
a small capillary space between the two and helping heat the fitting cup from the inside. On horizontal joints, preheating should be focused on the bottom two-thirds of the tube. It should be heated until the tube is close to soldering temperature, as indicated by the soldering flux beginning to bubble and clean the surface.
Next, the heat should be moved to the base of the fitting cup to bring it up to soldering temperature. The torch tip should be pointed from the face of the fitting cup out toward the tube so the cooler part of the flame continues to keep the tube at soldering temperature. The heat should then be applied to the base of the fitting cup. On horizontal joints, that should be somewhere off center near the bottom of the joint, before solder is added. If the solder does not begin to melt, more preheat should be added. Once the solder begins to melt, the torch should be moved along with the solder, keeping the heat only slightly ahead of where solder is being applied.
Step four: Cooling and cleaning
The completed soldered joint should be allowed to cool slowly and naturally. The new, no-lead alloys may not reject heat as quickly as their predecessors due to their lower thermal conductivity. Therefore, by controlling the amount of heat added to the joint in preheating and making the solder joint to the bare minimum required to facilitate full solder melting and flow, the solder will solidify and cool the joint quickly once it is complete and the direct heat from the torch is removed.
If the proper soldering procedures are followed, particularly in the preheating and heating process, consistent, high-quality solder joints can be achieved between copper tube and new, no-lead copper alloy (brass or bronze) fittings/components.
 [4]
[4]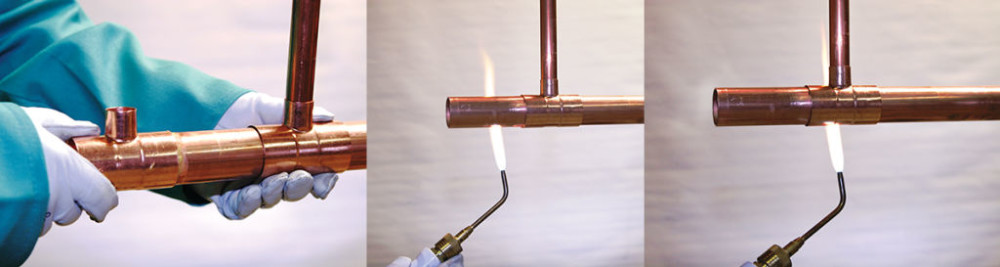 [5]
[5]Lead-free copper-base alloys evolve
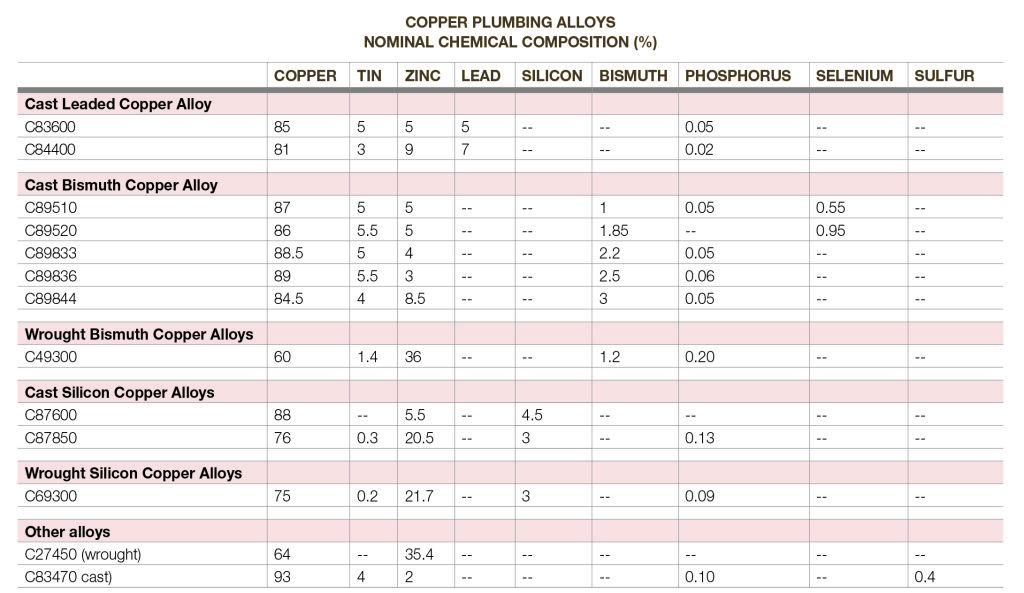
For more than two decades, the U.S. plumbing market has continuously moved to reduce the levels of lead in manufactured plumbing components, including those made of copper alloys like brass and bronze. Brasses and bronzes have long been used due to their relatively low melting point, high strength, exceptional castability and machinability, and good corrosion resistance.
Historically, leaded copper casting alloys like unified numbering system (UNS) alloys C83600 (i.e. red brass) and C84400 (i.e. semi-red brass), were used specifically for their beneficial casting and machining properties that facilitated the manufacture of complex parts like valve bodies and plumbing fittings. For highly machined parts like valve stems and parts, the wrought alloy C36000 (i.e. free-cutting brass), which sets the standard for machinability of all metal alloys, was a mainstay.
As the Safe Drinking Water Act (SWDA) took effect, manufacturers began to introduce alloys that primarily used a combination of bismuth and selenium to replace lead. While these alloys retained the beneficial properties of brass and bronzes for cast plumbing components, selenium was expensive so they came with a cost disadvantage. Alloy developers, foundries, and plumbing manufacturers continued to work to develop new alloys that did not rely on the use of selenium; thus developing new copper-bismuth and copper-silicon alloys for use in manufacturing lead-free plumbing components.
 [6]
[6]Some of the popular copper-bismuth (bismuth brass) alloys are C89844, C89833, and C89836 for casting, along with C49300 for wrought products. In these alloys, bismuth acts much like lead did. As a low melt point alloy with relatively low solubility during casting of plumbing components, it solidifies in the alloy-filling casting porosity voids and acts as a chip-breaker making downstream machining processes such as threading easier. However, since bismuth is not soluble in the alloy matrix, it gives no additional strength to the alloy. Additionally, there are concerns that any bismuth-containing alloys require special segregation when plumbing components are removed after use and recycled.
Copper-silicon (e.g. silicon brass, silicon bronze) alloys have started to become more popular in manufacturing plumbing components. This includes the casting alloys C87850 and C87600, as well as the wrought alloy C69300 (which has essentially the same chemical composition as the C87850 casting alloy). Unlike bismuth in the copper-bismuth alloys, silicon is highly soluble in the alloy matrix, so it does not fill porosity voids during product casting, but it does add mechanical strength. When combined with phosphorous in the alloy, it also improves machining properties. From a resource standpoint, silicon is more abundant than bismuth, but like bismuth, silicon-containing copper alloys may also require special segregation during recycling. Further, silicon decreases the thermal conductivity of the alloy and may create a surface layer that decreases solderability. As a result, solder joint plumbing products made of these alloys do require special care during installation.
More recently, existing low-lead alloys like C27450 and others are being used to replace C36000 in machined parts, and new casting alloys that do not use lead, bismuth, or silicon like C83470 are arriving on the scene. Plumbing manufacturers and alloy developers continue to use or create other low-lead and lead-free copper alloys to create long-lasting, reliable plumbing valves, fittings, and components that can be recycled over and over again.
Conclusion
The copper industry and plumbing component manufacturers have come a long way in a short amount of time to put new no-lead brass and bronze valves, fittings, and components into the market that meet the Federal Reduction of Lead in Drinking Water Act and retain the long-lasting, reliable performance the industry has come to expect. Following the steps outlined in this article for installing these components through proper soldering helps ensure these products perform leak-free from installation and throughout the plumbing’s lifecycle.
Andy Kireta Jr., vice president of the Copper Development Association (CDA), is responsible for the use of copper and copper alloy systems and products in building construction applications, including plumbing, mechanical, and architectural systems. Kireta has been active in the development, specification, application, code, and standards acceptance and market promotion and education of the use of copper in building construction for CDA since 1992. He can be contacted by e-mail at andrew.kiretajr@copperalliance.us.
- [Image]: http://www.constructionspecifier.com/wp-content/uploads/2015/05/copper_A-Plumber-Shows-the-Proper-Soldering-Technique-When-Working-With-Copper-Pipe.png
- [Image]: http://www.constructionspecifier.com/wp-content/uploads/2015/05/copper_Figure-1-Reaming-Deburring-tool.png
- [Image]: http://www.constructionspecifier.com/wp-content/uploads/2015/05/copper_Figure-2-Cleaning-Fitting-brush.png
- [Image]: http://www.constructionspecifier.com/wp-content/uploads/2015/05/figure-2.jpg
- [Image]: http://www.constructionspecifier.com/wp-content/uploads/2015/05/edit1.jpg
- [Image]: http://www.constructionspecifier.com/wp-content/uploads/2015/05/edit2.jpg
Source URL: https://www.constructionspecifier.com/properly-soldering-no-lead-copper-alloys/