From old to new: Chicago’s retail roof overhaul
by tanya_martins | May 28, 2025 3:02 pm
By Justin Ramsey
 [1]
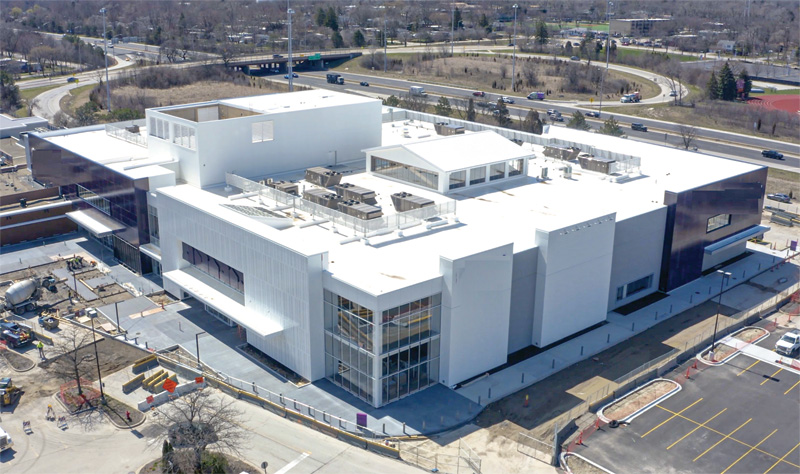
[1]This roofing task was for one of the country’s biggest online providers of furniture, rugs, lighting, and other home decor products, which now offers another option for in-person shoppers in the Chicago area. The online retailer’s first true attempt to break into physical retail opened in the Spring of 2024 with more than 141,000 m2 (152,000 sf) of retail space on Lake Avenue in Wilmette, Ill., about 22 km (14 miles) outside of Chicago. The new retail store offers interactive experiences from 19 departments, ranging from furniture and decor to outdoor living, home improvement, and more.
Roof replacement and renovation process
 [2]
[2]Before the state-of-the-art retail store could open, the vacant two-story building, originally built in the 1950s as home to Carson’s department store, had to undergo a major facelift. This included a full interior gut renovation for the new program, as well as envelope improvements of the exterior facade and existing roof review.
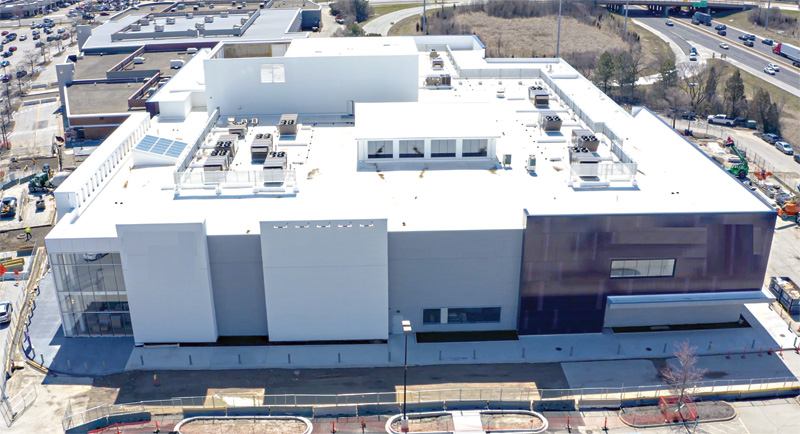
As part of the massive renovation project, the facility’s old 7,600 m2 (82,000 sf) ballasted ethylene propylene diene monomer (EPDM) roof had to be assessed. As a result, the decision was made to remove the concrete deck completely and replace it with a newer technical system. This newer system is required to perform well in the harsh local weather and protect the store’s valuable contents. The advantages of the technical update remove the weight of the ballast on the existing building and structure system as a benefit. The proposed allows a simpler technology to be seen if repairs are required in the future.
 [3]
[3]Challenges and complexities
Preservation Roofing Services of Romeoville, Ill., was hired to remove and replace the aging roof. Preservation Services is a third-generation roofing company that specializes in installing and maintaining a variety of commercial roofing systems, including polyvinyl chloride (PVC), thermoplastic olefin (TPO), EPDM, and modified bitumen. The company is a member of the National Roofing Contractors Association (NRCA) and the Chicago Roofing Contractors Association (CRCA).
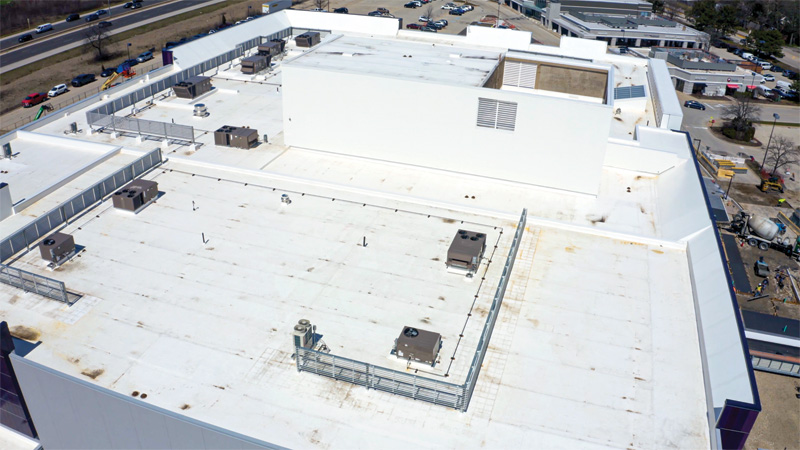
“The roof was not your typical wide-open 7,600 m2 [82,000 sf] job,” says Brennan Quinn, project manager for Preservation Services. “The roof was divided into three sections, the largest of which includes a highly complex tapered system. In addition, the roof has two knee wall dividers and a parapet wall that ranges from 1.2- to 4.2-m (4- to 14-ft) tall, several large concrete curbs for the old mechanical systems, a new clerestory atrium in the center of the building, a large new skylight, and large penthouse structure. So, there are plenty of things to deal with on this project.”
 [4]
[4]Installation process and completion
Due to the nature of this overhaul, all the roofing work had to be coordinated between the general contractor and the various subcontractors working on the project.
 [5]
[5]The first step was removing the old roofing ballasted system and discovering nearly 50 original drains set in the concrete deck. The 10-person tear-off crew first vacuumed the roof and removed the old loose-laid EPDM roofing membrane installed over tapered expanded polystyrene (EPS) insulation.
Once 85 percent of the old roof was removed, they started re-roofing by installing a vapor barrier and temporary roof cover. The new air/vapor barrier material consists of a 40-mil composite sheet with 35 mils of self-adhering rubberized asphalt laminated to a 5-mil woven polypropylene film (to provide adherence to the substrate). The material is supplied in 1-mm (39-in.) by 30-m (100-ft) sheets.
The air/vapor barrier was secured to the deck using a two-component, low-rise, VOC-free, polyurethane adhesive. This material is supplied in 1-mm (39-in.) by 30-m (100-ft). The air/vapor barrier was then secured to the cleaned concrete deck using a two-component, low-rise, VOC-free, polyurethane adhesive. The crew applies Parts A and B of the adhesive to the concrete deck with a spray rig setup. A catalytic reaction (of parts A and B) allows the adhesive to mix, expand, and foam, creating the binder. Each resprayed adhesive layer expands to 1.6–3.2 mm (0.0625–0.125 in.) for an additional R-value of .020 to .050 for each pass. Now, with the barrier, the roof is temporarily protected.
“As part of the tear-off process, we had to remove and replace the old drains installed across the roof. We upgraded them with new construction drains, which will meet the service and performance expectations of the new roofing system,” says Quinn.
 [6]
[6]As another coordination per the project’s phasing, once the new drains were installed, the roofers covered them with the temporary roof membrane until the plumbing crew could connect them to the existing plumbing system beneath the roof deck.
In addition to the air/vapor barrier, the new roof assembly would eventually include two layers of 66-mm (2.6-in.) polyisocyanurate (polyiso) insulation, 3.2 mm (0.125 in.) of tapered polyiso insulation to provide slope to the drains, a 6.25 mm (0.2461 in.) gypsum-based cover board, and a fully adhered, white 80-mil PVC roofing membrane as the final product.
“Since this was an active construction project, we could only load the roof with about a third of the materials we needed at a time,” adds Quinn. “Each load craned to the roof consisted of about 12 truckloads of materials including 1.2 x 1.2 m (4 x 4 ft) sheets of polyisocyanurate insulation, tapered insulation, cover board, as well as the membrane and adhesives.”
Once the air/vapor barrier, which also acted as a temporary roof, was installed, the roofing contractor started with the smallest section of the roof and installed the two layers of polyiso insulation, staggering the joints to eliminate air leakage, as well as the tapered insulation, all with the two-part adhesive. The staggering of the joints helps increase the ability of the insulation panels to do their job. The direct adherence to the materials allows the roof to be installed better since there are no fasteners that might transmit heat through a system.
“The two-part adhesive is a great product and really easy to use. It’s perfect for installing polyiso on concrete. Our plan called for a relatively tight bead pattern of 101.6-mm (4-in.) on center (o.c.) spacing in the corners, and 152.4-mm (6-in.) o.c. bead spacing around the perimeter and in the field of the roof.
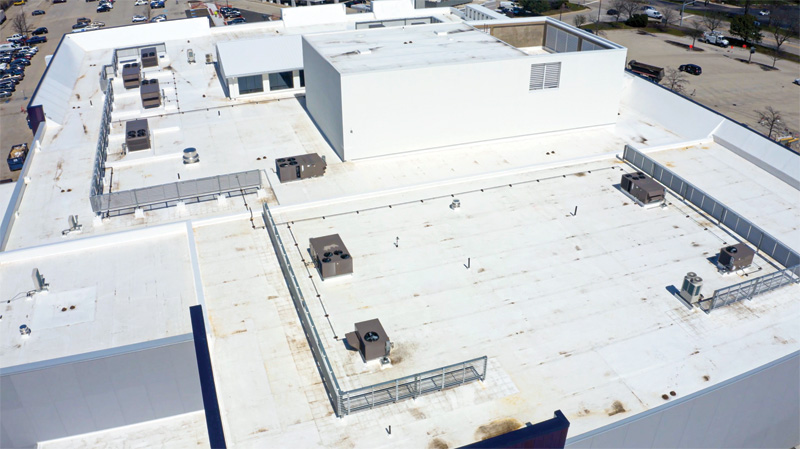
A low parapet or knee wall divides the roof into three sections. The largest section, approximately 5,760 m2 (62,000 sf), includes a new clerestory atrium with a standing seam metal roof, a penthouse for the elevator shafts and new mechanical units, a new skylight, and most of the roof drains.
“This was the most challenging part of the roof,” says Quinn. “We had to install tapered insulation everywhere, plus there are about 20 crickets on that section of the roof, including on the mechanical penthouse, to properly slope the roof to the new drains.”
For this part of the project, the roofing crew used the same two-part adhesive to install two layers of polyiso as fill insulation, with the tapered insulation over the top. In addition, due to the various drain locations and penetrations on the deck, the tapered design called for more than 30 separate sloped planes on that section of the roof with the mechanical penthouse, not including the crickets.
“Not only was the overall tapered design highly complex, but the field team also had to match four-way tapered layouts with two-way layouts in several locations, particularly around the new clerestory atrium, and the mechanical penthouse, which was really tricky,” says Quinn.
The four-way and two-way terms refer to the tapered design for different ways to direct water to a drain. The four-way option is better, but it is more expensive than the two-way option. The application is determined by the specific roof and drain design.
The roofing contractor worked closely with the tapered insulation manufacturer to design a tapered layout that allowed water to flow freely around the numerous penetrations and the original concrete mechanical supports on the roof and to the internal drains.
“We had to taper almost the entire roof for drainage,” describes Quinn. “But on one of the smaller sections, where the deck was already sloped, we were able to install just the flat stock and then add a few crickets to the drains, rather than sloping the entire section.”
Once the insulation was installed, the entire roof was covered with the 6.25 mm (0.246 in.) reinforced gypsum cover board, which served as a solid substrate for the new PVC membrane. As noted previously, this cover board is also a good practice for insulation protection from maintenance traffic or harsh weather.
“We used the same two-part adhesive to install the polyiso, the tapered ISO, and cover board and we find that the large canisters [189 L (50 gal) drums] are really good for helping productivity in the field. Our guys averaged about 279 m2 (3,000 sf) a day installing the tapered system,”
says Quinn.
Another challenge was dealing with the existing concrete curbs installed on the roof deck in various locations that originally supported the building’s mechanical and air-handling equipment. Each of the 10 concrete curbs is about 9 m (30 ft) long, 508 mm (20 in.) high and spaced about 8 m (25 ft) apart in two different areas on the roof.
While not part of the roofing work, the concrete curbs had new steel decking installed across each section to create large flat ‘roof’ surfaces, spanning about 16 x 24 m (55 x 80 ft) in total. The new PVC membrane would cover these surfaces rather than leaving each support to be individually flashed and covered with the membrane. Installing the steel from curb to curb provided a new substrate, which could be covered with membrane, rather than running the membrane over and around each concrete curb, which would have been more time-consuming.
The roofing crew filled the voids between each concrete support with insulation and installed the reinforced cover board on the new metal decking between the concrete curbs. They then terminated the PVC membrane at the deck with fasteners and plates on all four sides, welded a new membrane bonded to the concrete curbs, and ran up and over the top.
All the 80-mil PVC membrane on the project was installed using a one-part sprayed contact adhesive with fast flash-off time for better productivity than traditional bonding adhesive application methods. The low-VOC adhesive is supplied in pressurized canisters and applied to both the roof deck or substrate and the back of the membrane using a 0.9-m (3-ft) long spray wand to ensure 100 percent coverage (fully adhered). The adhesive contains solvents that have to evaporate or flash off before the roofing material is applied; once the adhesive flashes off, the membrane is rolled onto the deck, brushed in place, and then rolled with a weighted roller for maximum contact.
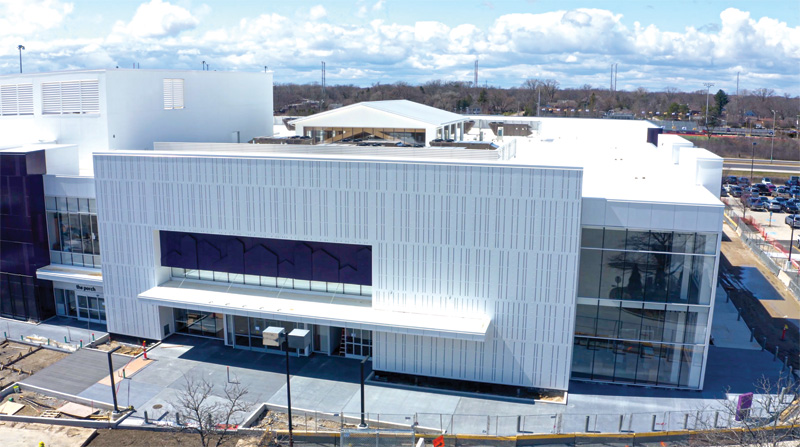
The entire roof has a perimeter parapet wall that ranges from about 1.2 to 4.2 m (4- to 14 ft.) tall. The tall sections are new portions of the facade that will eventually be the background for the company signage on the facility. The roofers installed a membrane from the deck up the side about 152.4 mm (6 in.) for the parapet walls and secured it with roofing fasteners and plates. They then welded new membranes below the fasteners and placed them up and over the parapet using the one-part adhesive, which was sprayed onto the wall and the membrane and then rolled in.
The internal knee walls between the various roof sections also had membrane installed up and over the top and were covered with a shop-fabricated coping cap.
The last part of the project included installing the roofing membrane on the six canopy roofs around the building. The canopies are all about 1.5 m (5 ft) wide and about 6 m (20 ft) long. The membrane was fully adhered to, and the canopies were terminated with a shop-bent fascia system. There was no gutter system or roof drains provided, making for an easier install.
Author
 [7]
[7]
Justin Ramsey is the PVC product manager at Carlisle Construction Materials, where he oversees PVC roofing membranes, accessories, and adhesives for all company brands. With extensive cross-functional management experience and a proven track record in the manufacturing sector, he brings valuable insights to his current role. Ramsey holds a master of manufacturing management from Penn State and is a certified PMP; outside of work, he enjoys spending time with his kids, sailing, and serving as an assistant scoutmaster in his local Scout troop.
Key Takeaways
A retail renovation in Wilmette, Ill., required a full roof replacement with different trades and team coordination. The 7,600-m² (82,000-sf) ballasted ethylene propylene diene terpolymer (EPDM) roof was removed, and a new technology high-performance system was installed. The system protecting the roof included a 40-mil air/vapor barrier (for flexibility in the installation and temporary roof protection), polyisocyanurate (polyiso) insulation (and tapered components), a gypsum cover (protection) board, and the final 80-mil PVC roof membrane. The tapered insulation system ensured proper drainage of the roof system, and the upgraded drain interfaces improved water management. All elements add up to a great roof for the building and many more years to go.
- [Image]: https://www.constructionspecifier.com/wp-content/uploads/2025/05/File-4.jpg
- [Image]: https://www.constructionspecifier.com/wp-content/uploads/2025/05/File-5.jpg
- [Image]: https://www.constructionspecifier.com/wp-content/uploads/2025/05/File-15.jpg
- [Image]: https://www.constructionspecifier.com/wp-content/uploads/2025/05/File-16.jpg
- [Image]: https://www.constructionspecifier.com/wp-content/uploads/2025/05/File-23.jpg
- [Image]: https://www.constructionspecifier.com/wp-content/uploads/2025/05/File-18.jpg
- [Image]: https://www.constructionspecifier.com/wp-content/uploads/2025/05/Justin-Ramsey.jpg
Source URL: https://www.constructionspecifier.com/from-old-to-new-chicagos-retail-roof-overhaul/