Properly soldering no-lead copper alloys

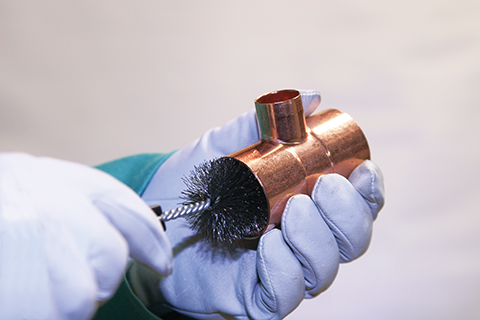
Step one: Preheat the tube
With the new, no-lead fittings/components, it is beneficial to preheat the tube more than would traditionally be done. First, the interior surfaces of the fitting/component should be heated from the tube surface. The preheating of the tube should be undertaken with the appropriately sized torch tip directing the flame perpendicular to the tube—about the same distance from the fitting cup as the length of tube inserted into the solder cup. For example, if the fitting cup is 25-mm (1-in.) deep, the tube should be preheated approximately 25 mm beyond the face of the joint. While there is no definitive time limit on preheating, the tube should be preheated until the flux at the face of the joint begins to become active (i.e. begins showing signs of cleaning the tube/fitting surfaces).
Step two: Preheat the fitting/component
Once the appropriate preheat has been applied to the tube, the flame should be moved back onto the fitting/component surface to the base of the fitting cup. Preheating the fitting is most effective when the torch is directed from the back of the fitting cup to the face of the solder cup. This torch position directs the greatest amount of heat from the back of the fitting cup towards the face, where the solder will be applied. This allows for the primary flame of the torch to concentrate heat into the fitting/component while allowing the secondary flame to keep the tube surface at temperature.
Step three: Apply heat and solder
Since the copper tube has excellent thermal conductivity, it will conduct heat throughout the tube length inside the fitting space. Additionally, the tube is expanding into the fitting cup, maintaining
a small capillary space between the two and helping heat the fitting cup from the inside. On horizontal joints, preheating should be focused on the bottom two-thirds of the tube. It should be heated until the tube is close to soldering temperature, as indicated by the soldering flux beginning to bubble and clean the surface.
Next, the heat should be moved to the base of the fitting cup to bring it up to soldering temperature. The torch tip should be pointed from the face of the fitting cup out toward the tube so the cooler part of the flame continues to keep the tube at soldering temperature. The heat should then be applied to the base of the fitting cup. On horizontal joints, that should be somewhere off center near the bottom of the joint, before solder is added. If the solder does not begin to melt, more preheat should be added. Once the solder begins to melt, the torch should be moved along with the solder, keeping the heat only slightly ahead of where solder is being applied.
Step four: Cooling and cleaning
The completed soldered joint should be allowed to cool slowly and naturally. The new, no-lead alloys may not reject heat as quickly as their predecessors due to their lower thermal conductivity. Therefore, by controlling the amount of heat added to the joint in preheating and making the solder joint to the bare minimum required to facilitate full solder melting and flow, the solder will solidify and cool the joint quickly once it is complete and the direct heat from the torch is removed.
If the proper soldering procedures are followed, particularly in the preheating and heating process, consistent, high-quality solder joints can be achieved between copper tube and new, no-lead copper alloy (brass or bronze) fittings/components.
Sign up for our weekly newsletter
Architectural materials and methods delivered right to your inbox
- CSI News and Notes: CSI Foundation’s construction camp; CSI spring exam; and more
- CSI News and Notes: CSI’s credentials; CSI conference theme; and more
- To be specific – CSI supports young AECO professionals
- CSI News and Notes: CSI’s foundation scholarships, national conference, and Crosswalk
- CSI News and Notes: AI’s impact; CSI 2024 conference, and more
Related Products
Read the Latest Issue